User interface


The functionality of FWCloud is complemented by numerous plugins.
Among them we have the plugin for HAProxy, which is widely used in installations where high availability and load balancing are required.
In this video we are going to show how we can install and maintain the HAProxy configuration from FWCloud.
FWCloud simplifies the configuration of this service as much as possible through rules that we can manage visually with all the flexibility that FWCloud offers us.
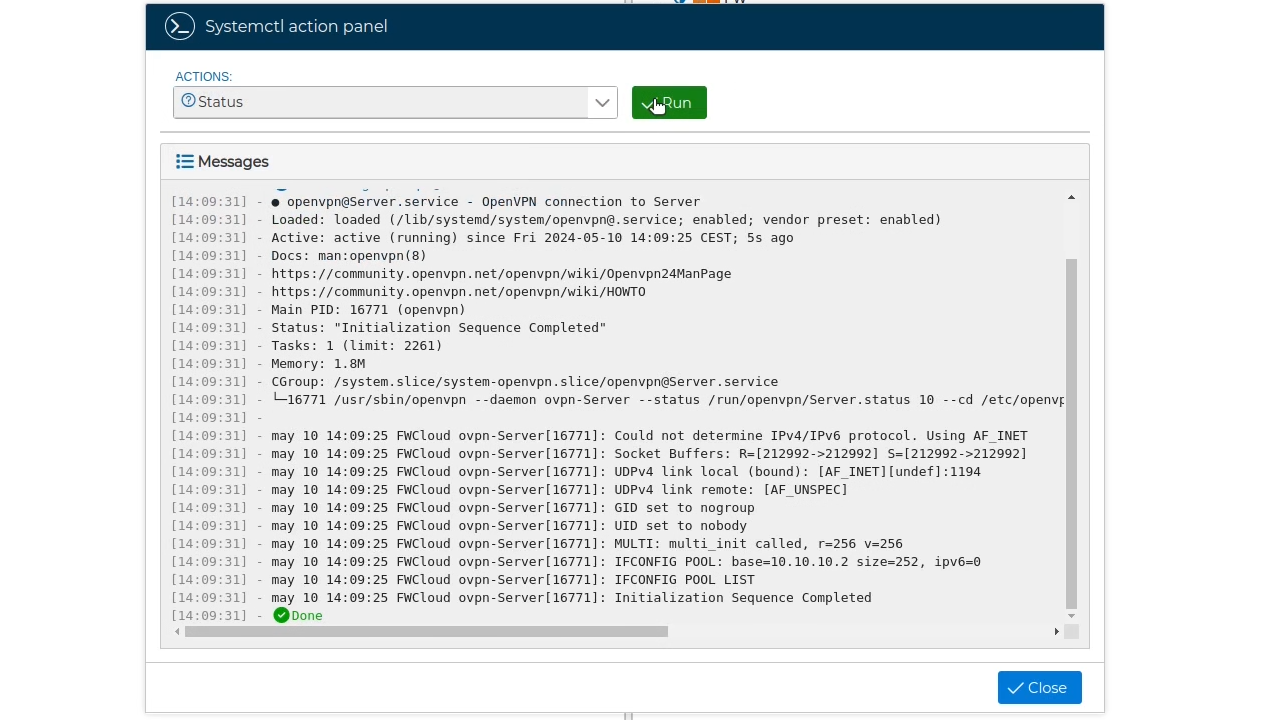
One of FWCloud's new features is the ability to control system services from the web console.
To illustrate this functionality, in this video we will install an OpenVPN server, we will create the Infrastruture PKI and administer the life cycle of the service, all without abandoning the web interface.
As shown in the video we can access the functionality called Systemctl from the contextual menu of the services.
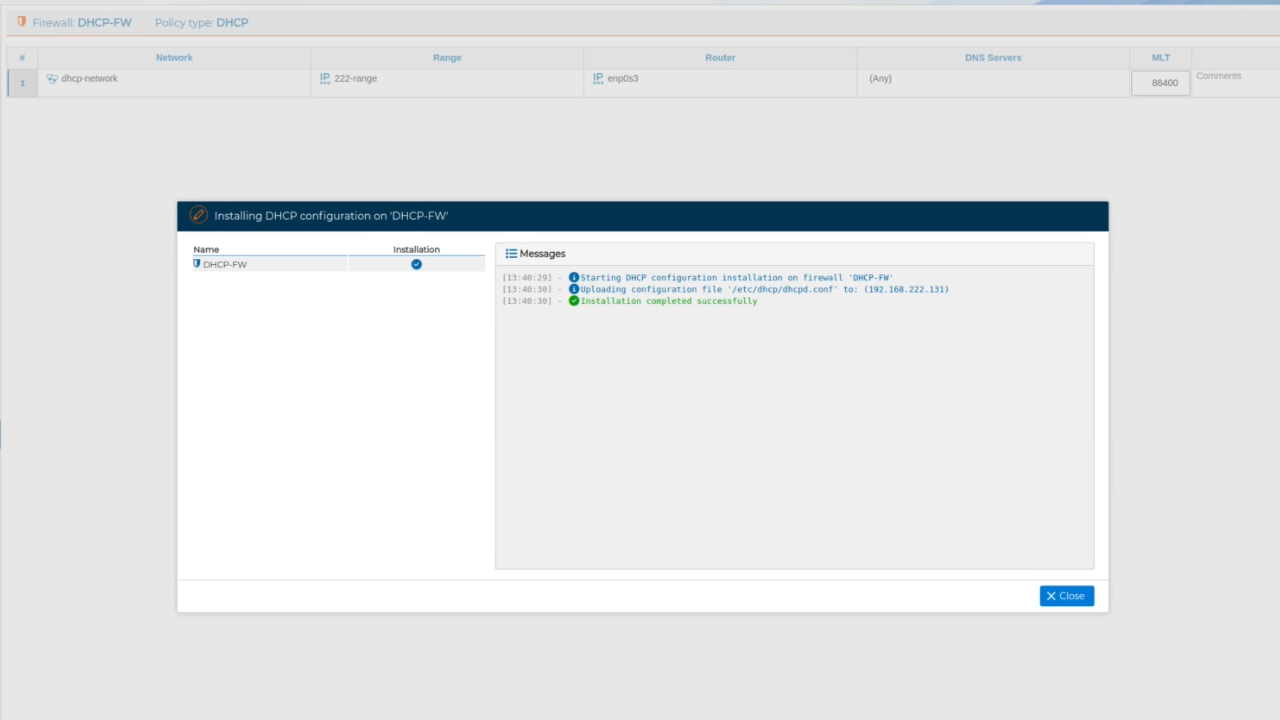
In this video we are going to show how we can install/uninstall and manage a DHCP server from the FWCloud console.
This makes it easier to manage the configuration and review the configured options in a visual and intuitive way, in addition to being able to manage several computers with a DHCP server from a single console accessible via the web.
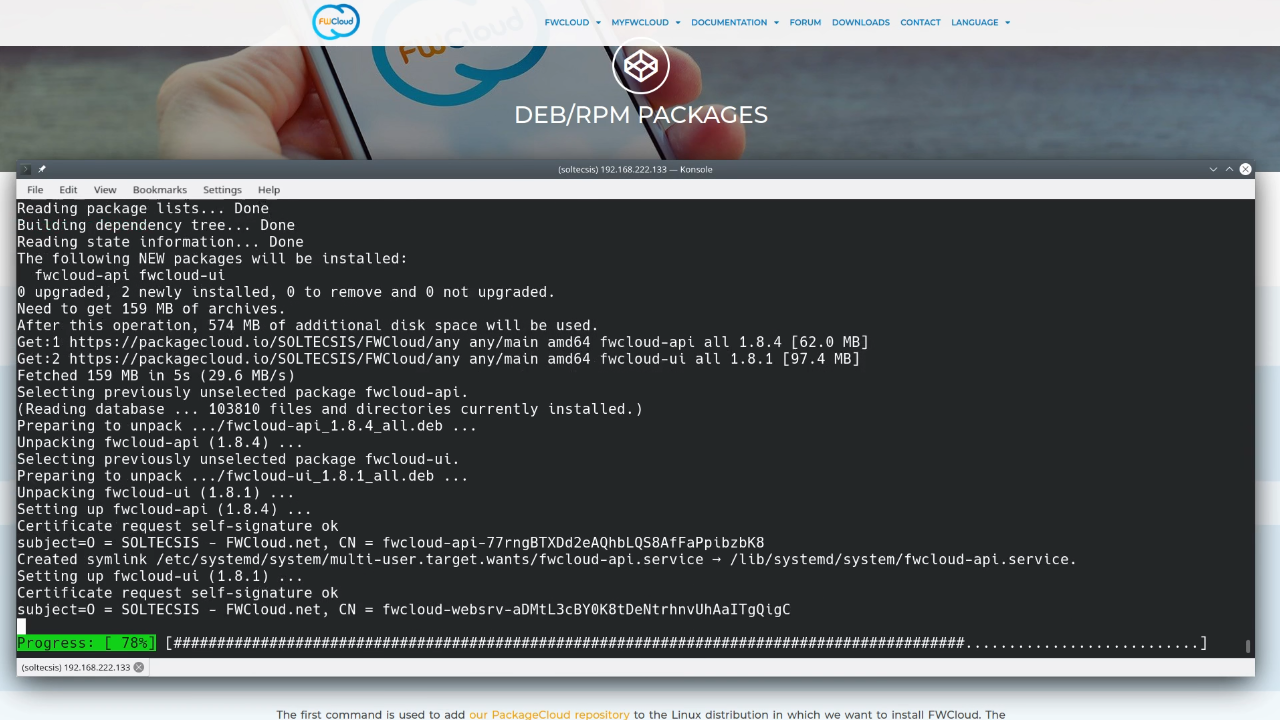
You can install FWCloud on your own servers. There are currently three ways to install FWCloud:
. Using your distribution's package manager (recommended method)
. Using the FWCloud-Installer script (the traditional method)
. Using a Docker image
In this video we are going to see how to install FWCloud using both .DEB and .RPM packages. This method is really simple and we can have FWCloud installed in less than 5 minutes.
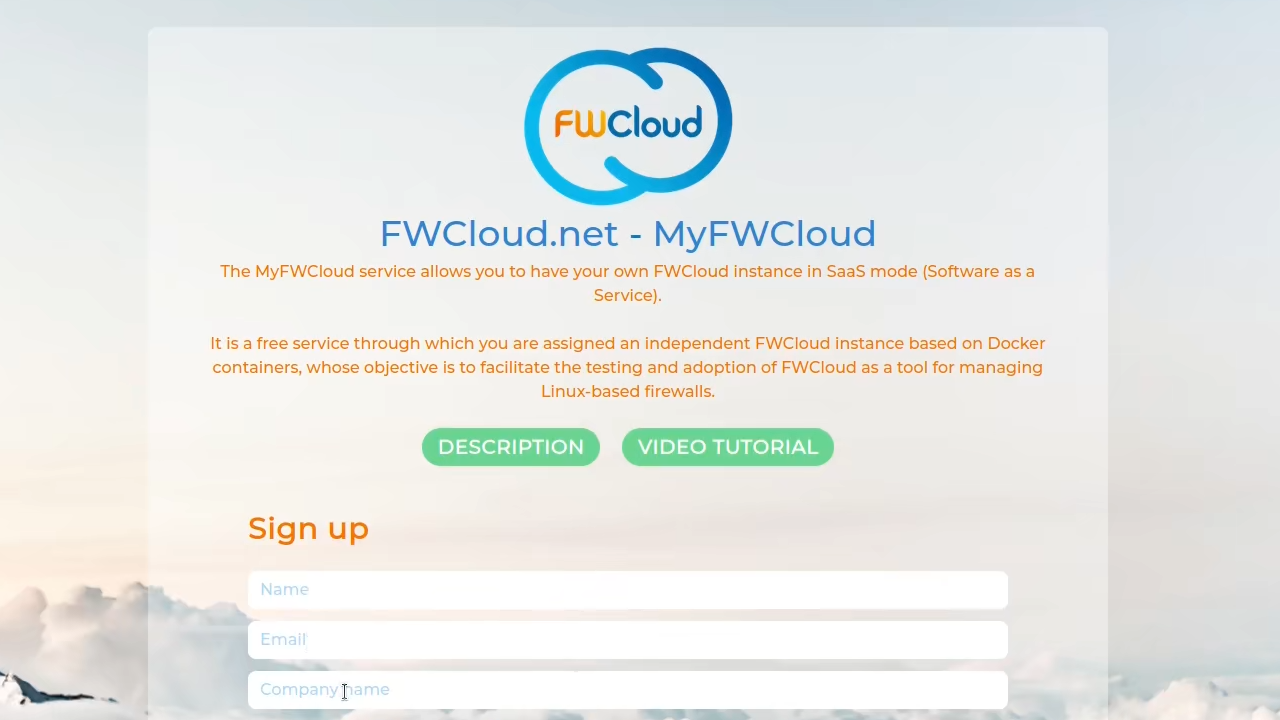
Now you can run FWCloud as a service. You can create an instance of the application in the cloud and use all the functionalities of FWCloud.
If you are thinking of evaluating the application or just want to take a look at its features, you can do so without having to search for a server or having to perform an installation. Just sign up with a valid email account and start using FWCloud.
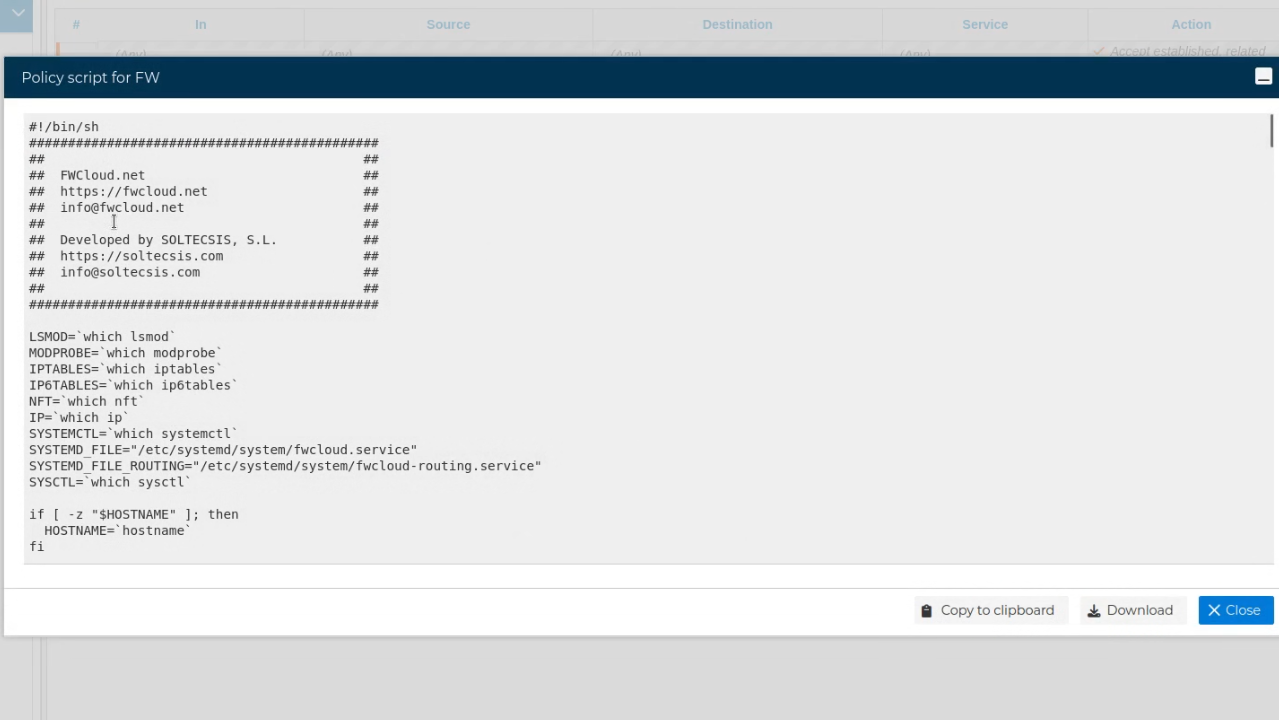
If you have ever wondered what is installed on the firewalls when the security policy is installed from FWCloud-UI, now you can review and download the content of the script to be installed on the firewalls.
You can access this script from the FWCloud console, without the need to enter the remote equipment.
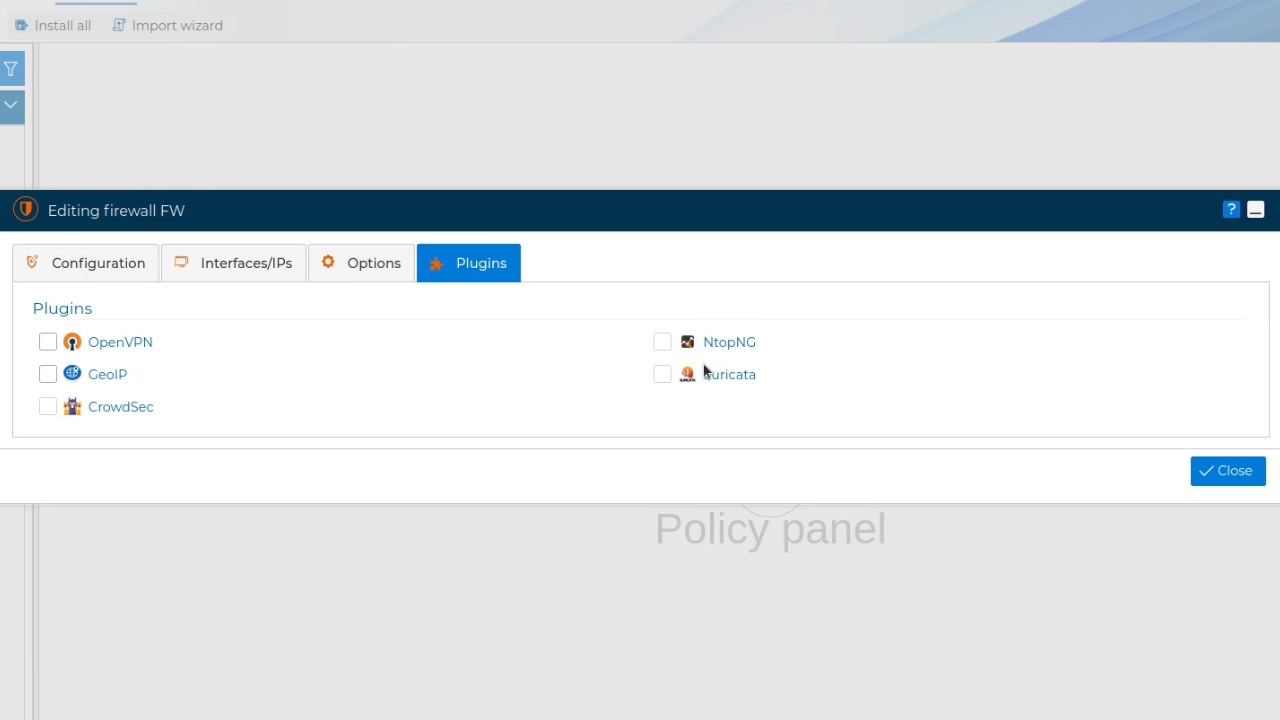
Now we can extend the functionalities of FWCloud by installing third-party security software directly from the FWCloud console.
Installing or uninstalling security software in the firewalls basically consists of checking or unchecking the corresponding plugin in FWCloud-UI.

FWCloud-UI has a special type of objects that represent geolocated IP addresses in each of the countries.
This allows us to create rules using these objects, in this way it is easy to avoid DoS or DDoS attacks if we have located from where they are taking place.
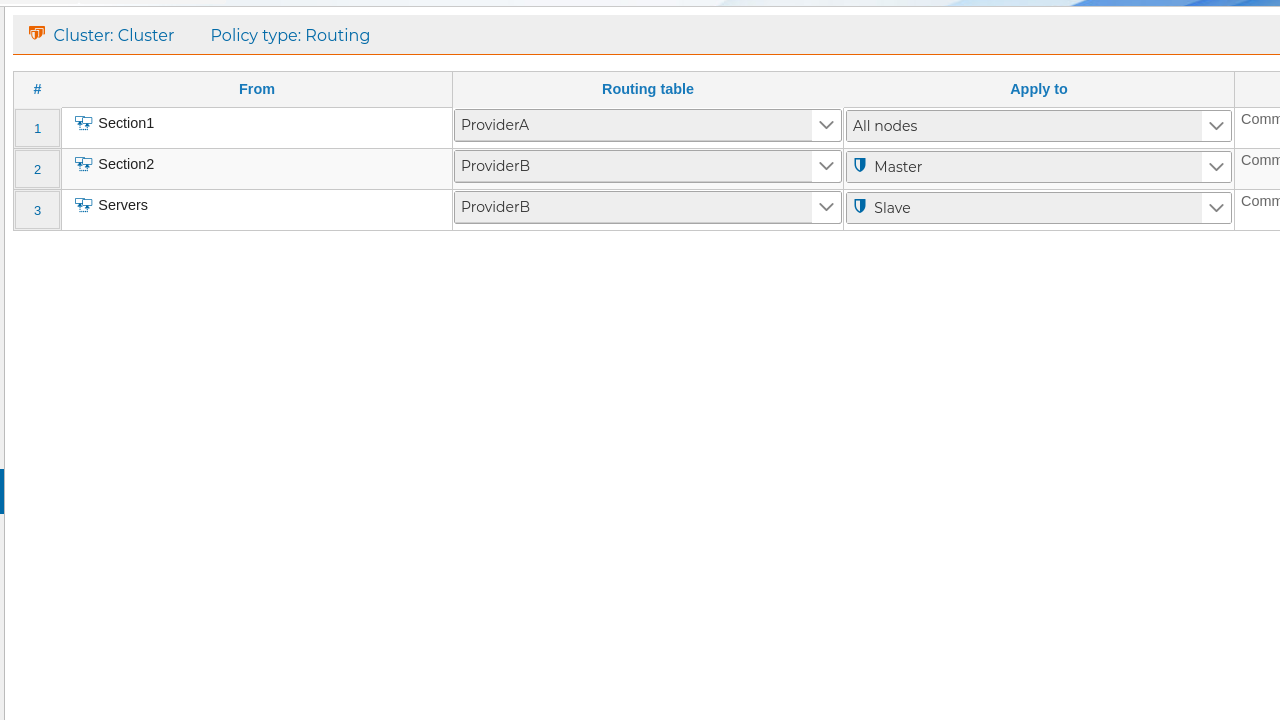
This new feautre update routing policy creation.
Now FWClou-UI allows us to select if the table or the routing rule is going to be installed on all the nodes of the cluster, or if we prefer it be installed only on a specific node.
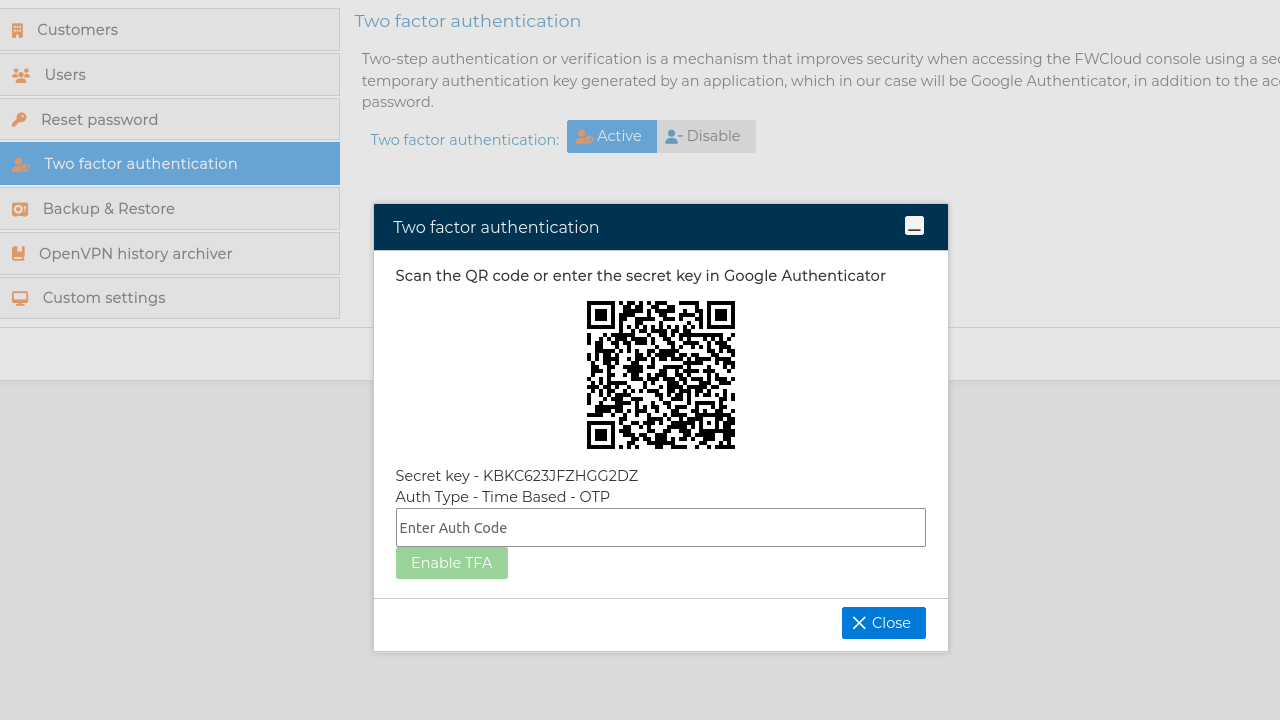
In addition to using the username and password, we can make access to FWCloud-UI even more secure by configuring a second authentication factor.
For this we need a device that only we have access to, for example our mobile, which we will configure to receive an authentication code.

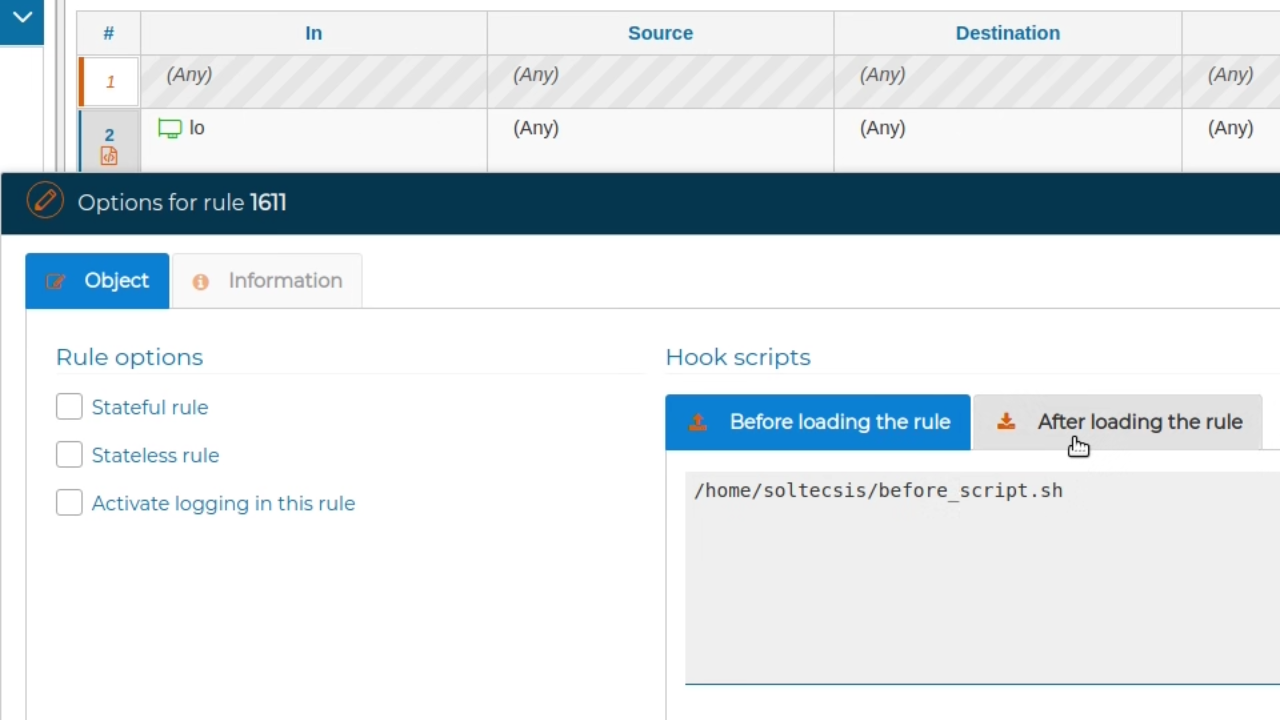
To improve the readability of the security policy we have modified the way hook scripts are added. We have created a new type of special rule for them that provides more simplicity while facilitating and accelerating the overall reading.
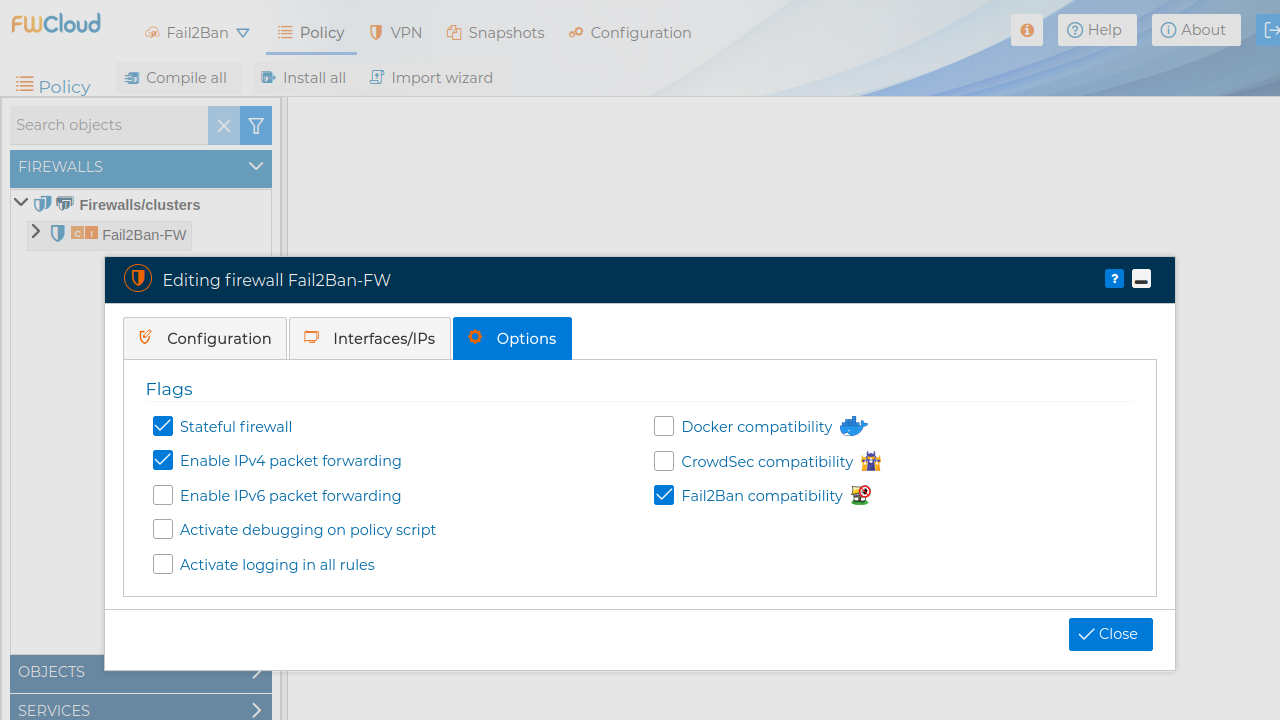
Fail2ban is an application for the prevention of intrusion into a system, which acts by penalizing or blocking remote connections that attempt access by brute force. Fail2Ban acts by adding rules to the security policy of the system. In FWCloud-UI a new option has been added in the firewall configuration that allows the reinstallation of the policy without interfering with the rules added by Fail2Ban.
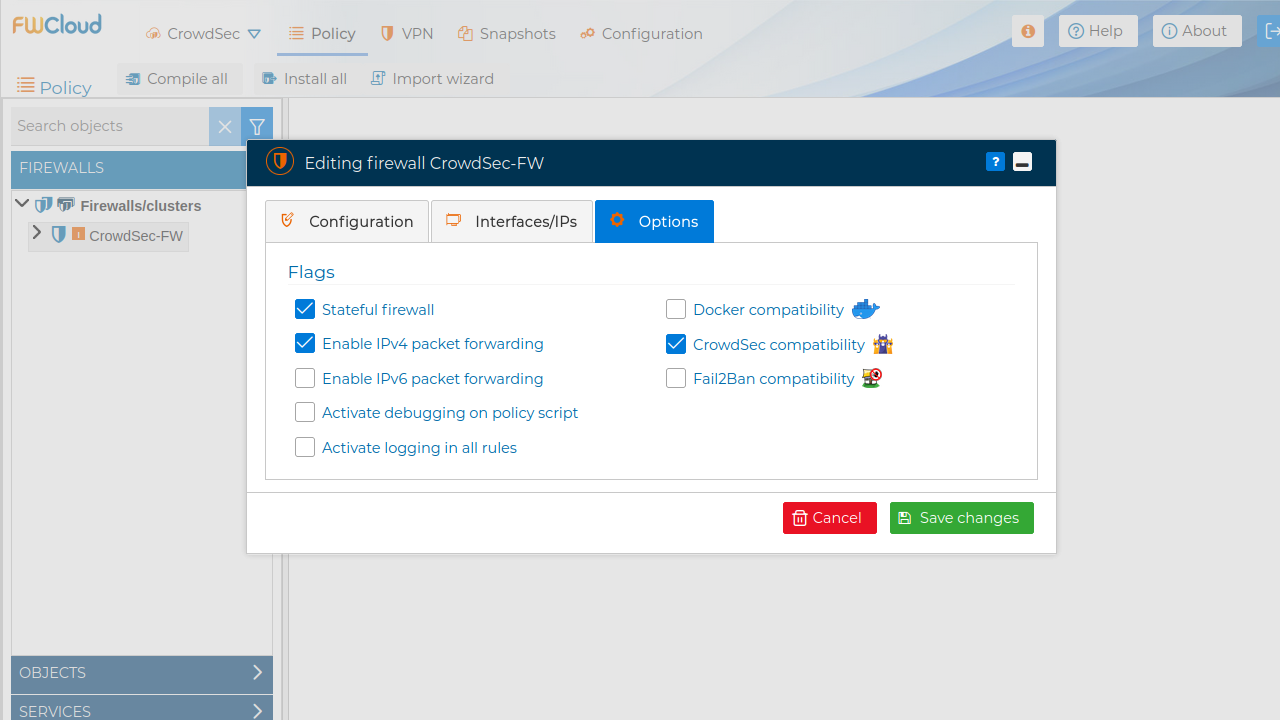
CrowdSec is one of the most used open source applications to prevent intrusion attacks. FWCloud-UI now takes this application into account to prevent it from interfering with the installation of a new security policy. In this new video we show how to activate the CrowdSec compatibility option.
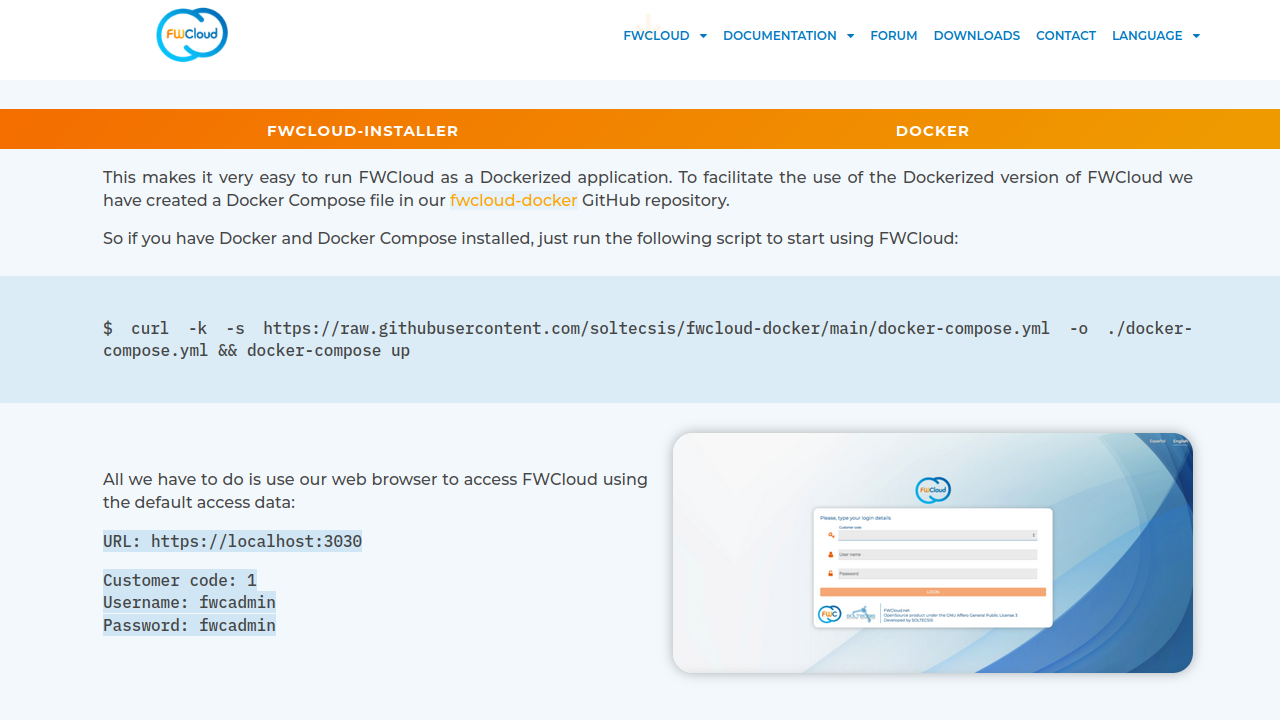
FWCloud can be installed using a Docker image. In this way you can have FWCloud installed and running in a matter of minutes. If we have Docker and Docker Compose on our system, the installation is reduced to running a single line.
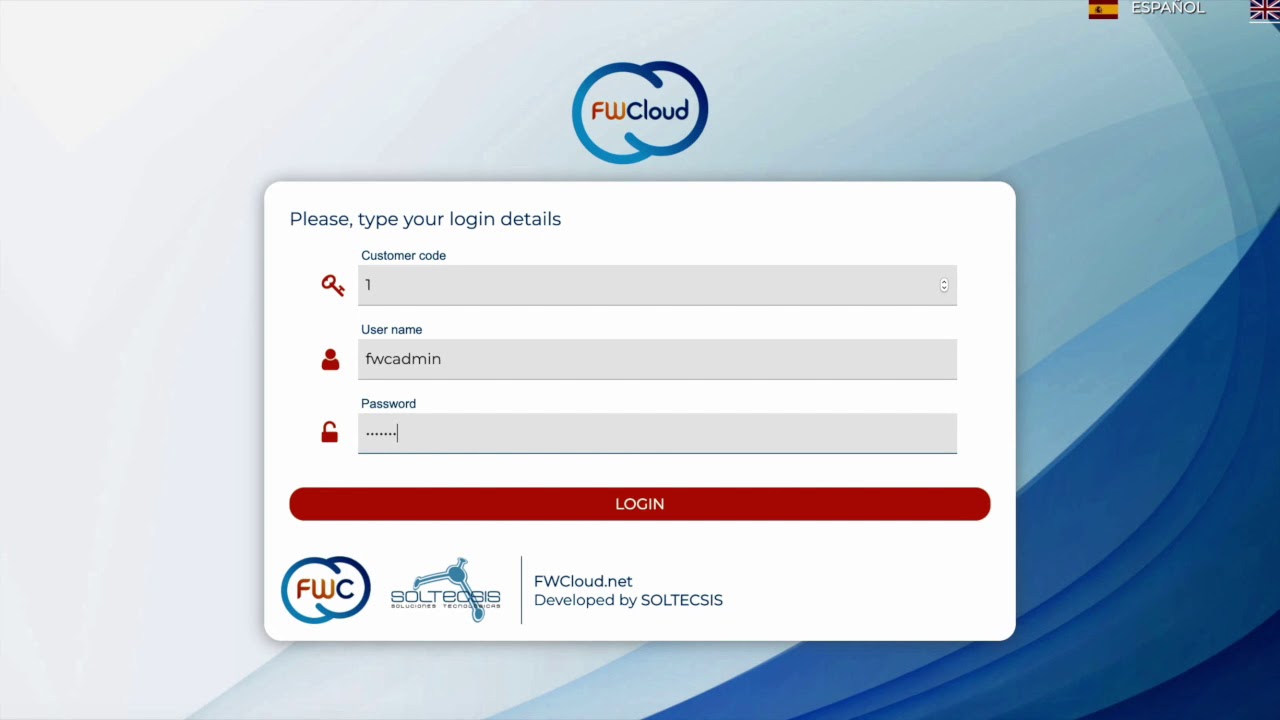
As we explained in the instalation section, we have to open the access URL to FWCloud-UI to be able to download the user interface and execute it in our browser. Once the download is complete, the login window will be presented. In a new installation, the default access data will be:
Customer code: 1
User name: fwcadmin
Password: fwcadmin
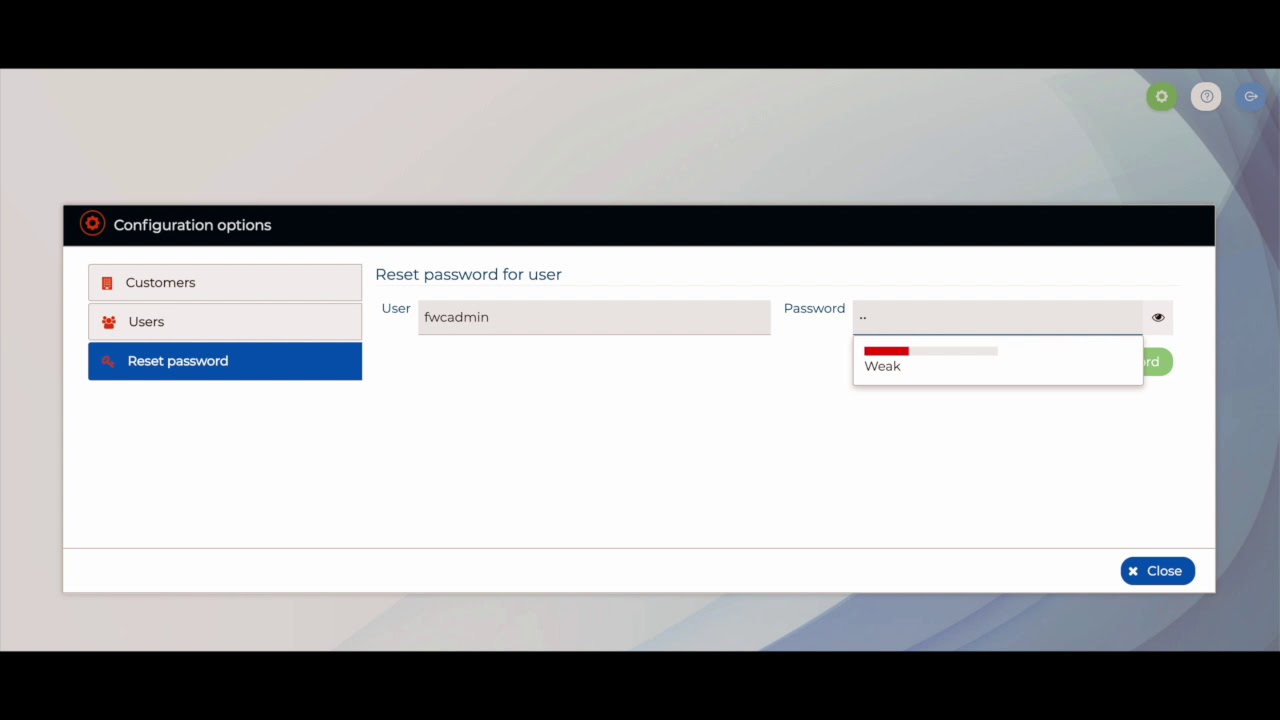
Since the default password for a new installation is very insecure, it is convenient to change it as soon as possible.

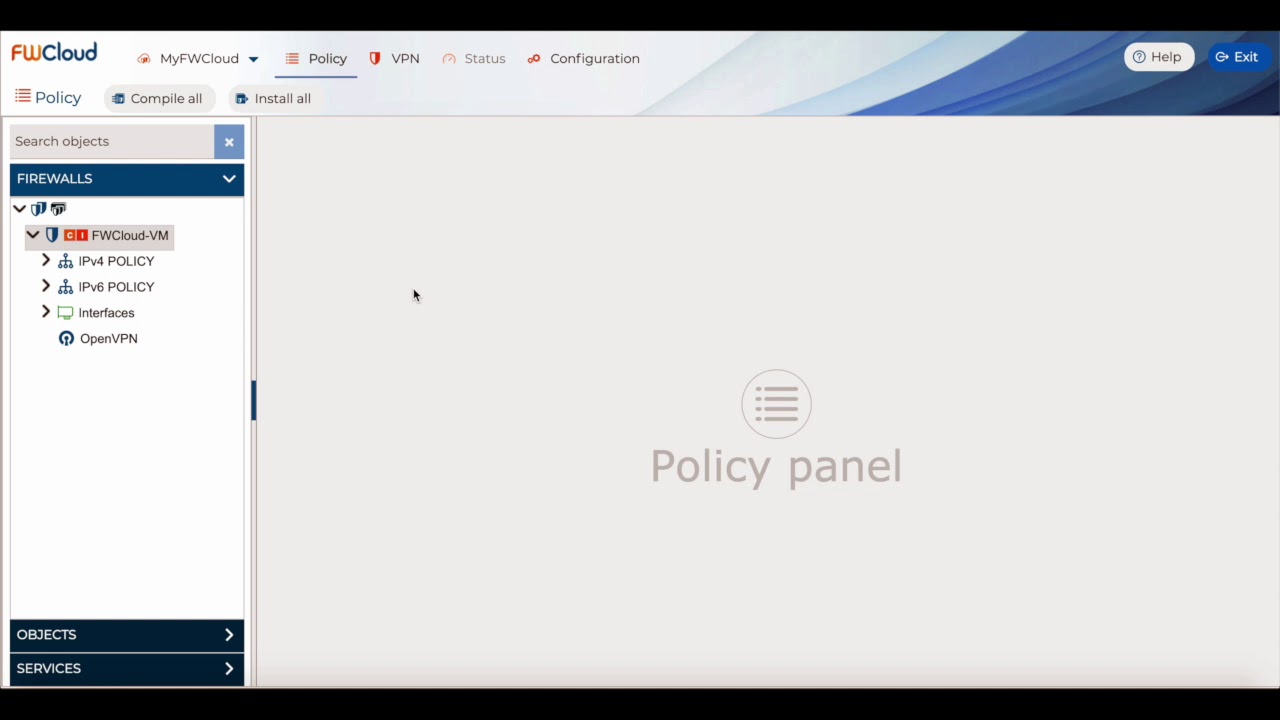
The first thing we have to do to get started is to create our first FWCloud.
An FWCloud is a logical grouping of firewalls, firewall clusters, IP objects, VPN connections, etc.
We can have an FWCloud for each of our clients or, for example, one for each country for a multinational company.
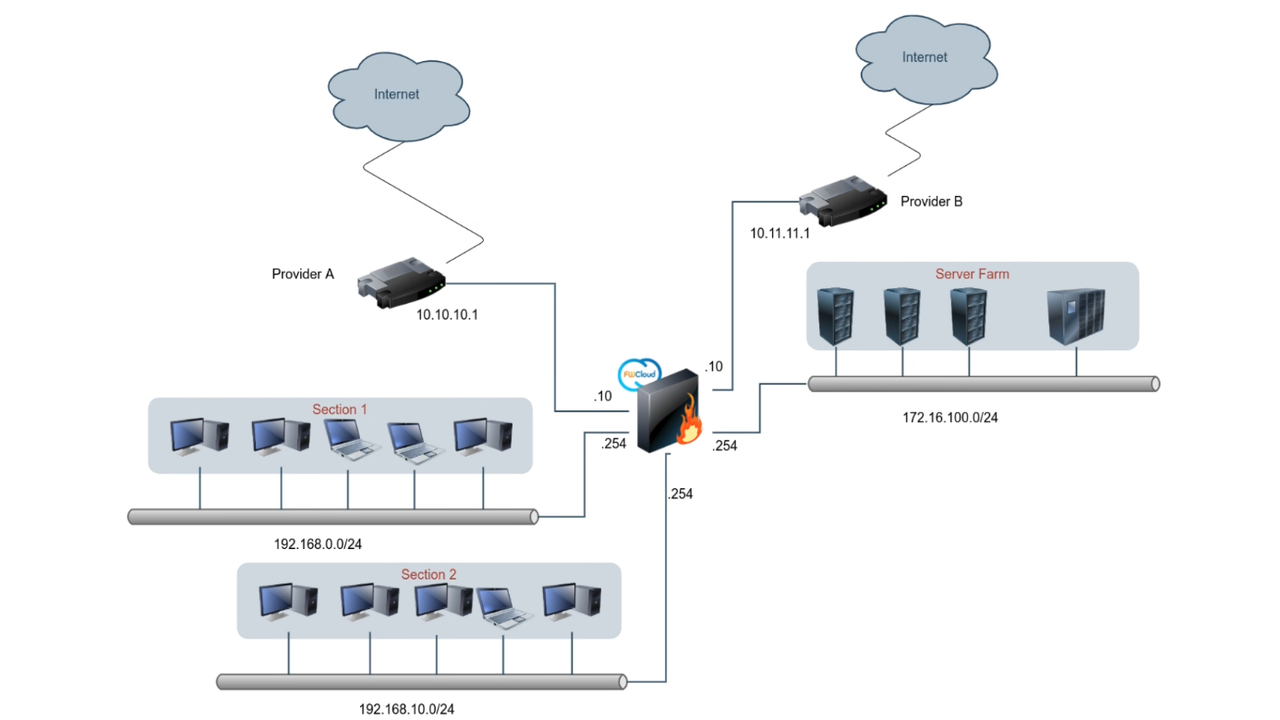
We are going to create our first Firewall within the FWCloud that we created in the previous step. We will use this firewall for the machine in which we are running FWCloud, which in the case of this tutorial, it's a virtual machine created from FWCloud-VM.
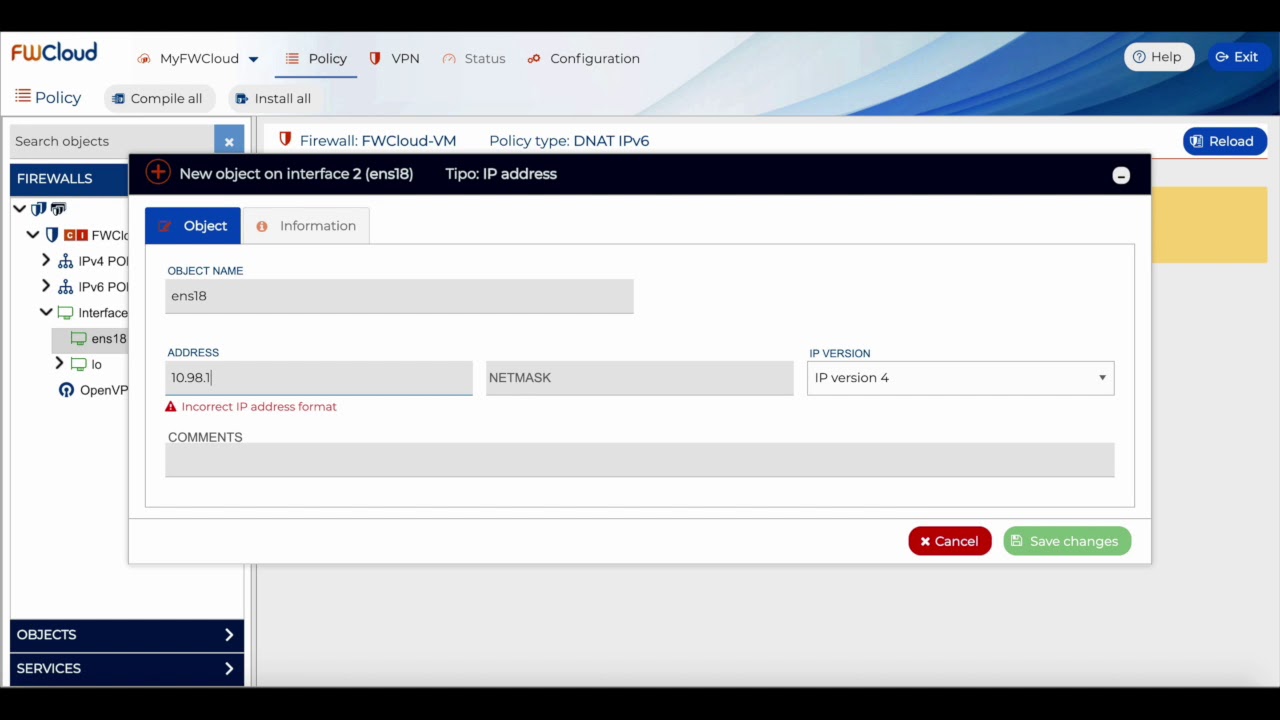
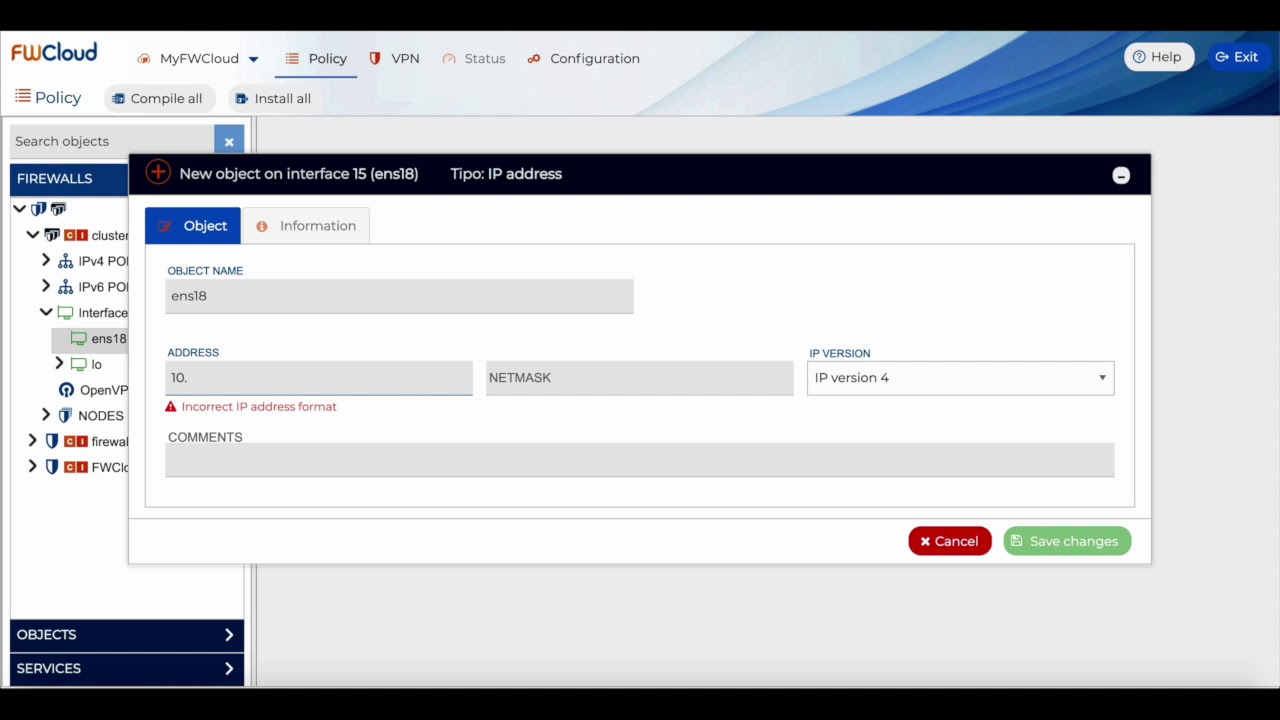
In this video, we create the network interfaces that the firewall will have. We also define the interface and IP address that we will use for the installation of the security policy.
The security policy is loaded using a shell script that is uploaded to the firewall using SSH. Therefore, we have to have SSH access from our FWCloud server to the indicated IP address.
In this case, as we are creating the firewall for our own FWCloud server, the IP address will be localhost.
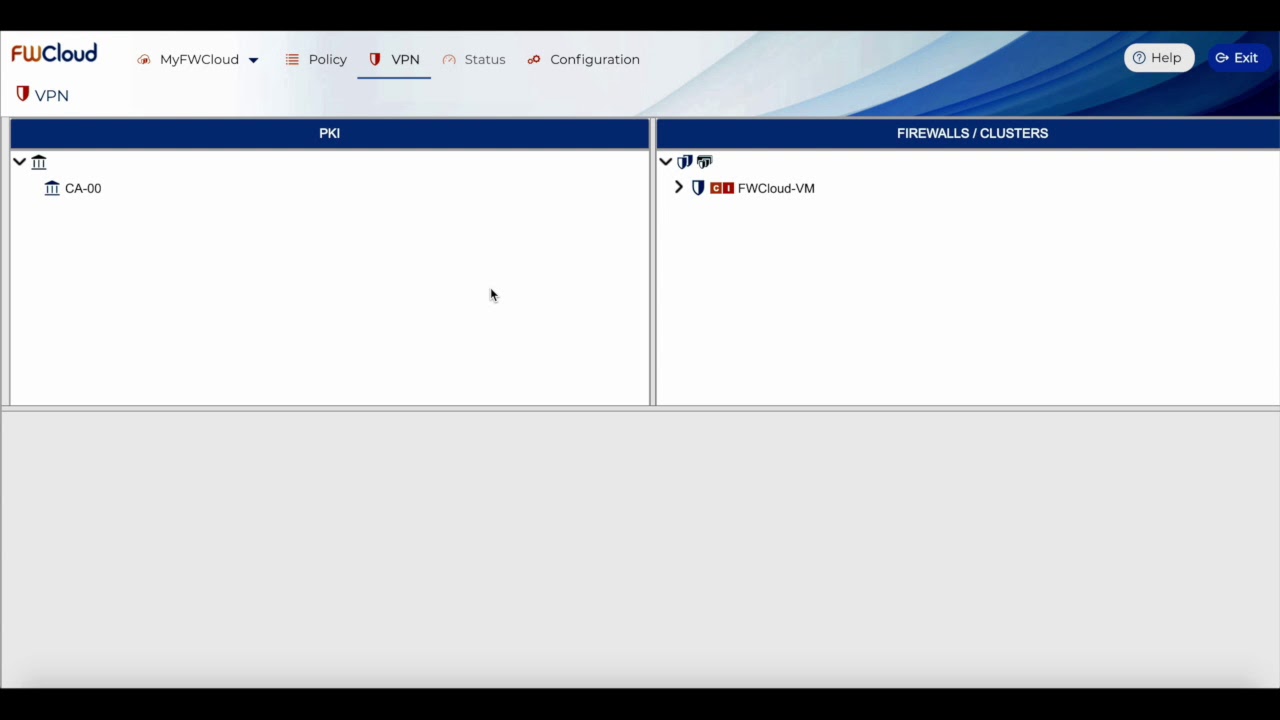
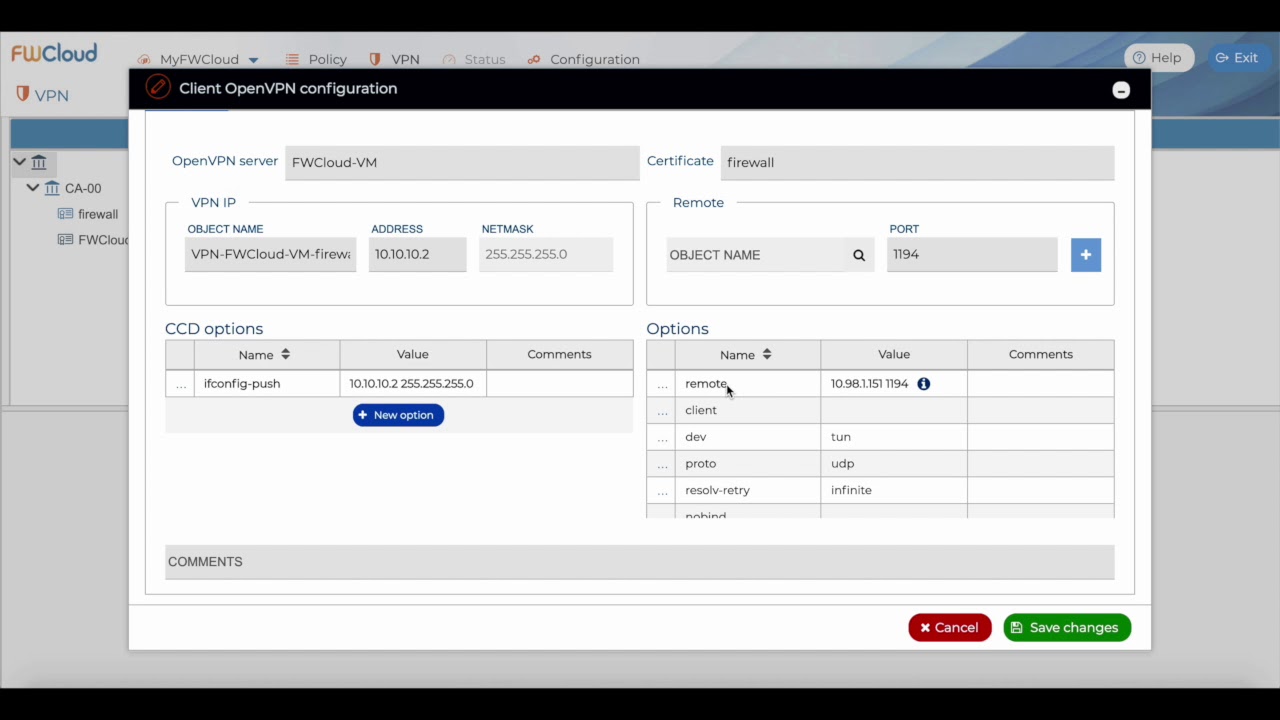
In order to create VPN connections we need to have a PKI (Public Key Infrastructure) through which to generate certificates linked to each VPN connection, in such a way that they identify each VPN in an univocal way.
As you'll see, it's very easy to create a PKI and server / client certificates through FWCloud-UI.
Since all the firewalls connected to our FWCloud server will be managed using SSH connections, it is highly advisable that they connect to our server using a VPN connection.
This is what we call administration VPNs, that is, VPN connections through which we manage our cloud of firewalls safely.
To do this we are going to create an OpenVPN server in our FWCloud, in a very simple way through the FWCloud-UI user interface. We will also create a client VPN configuration for a firewall that we are going to use in this tutorial.
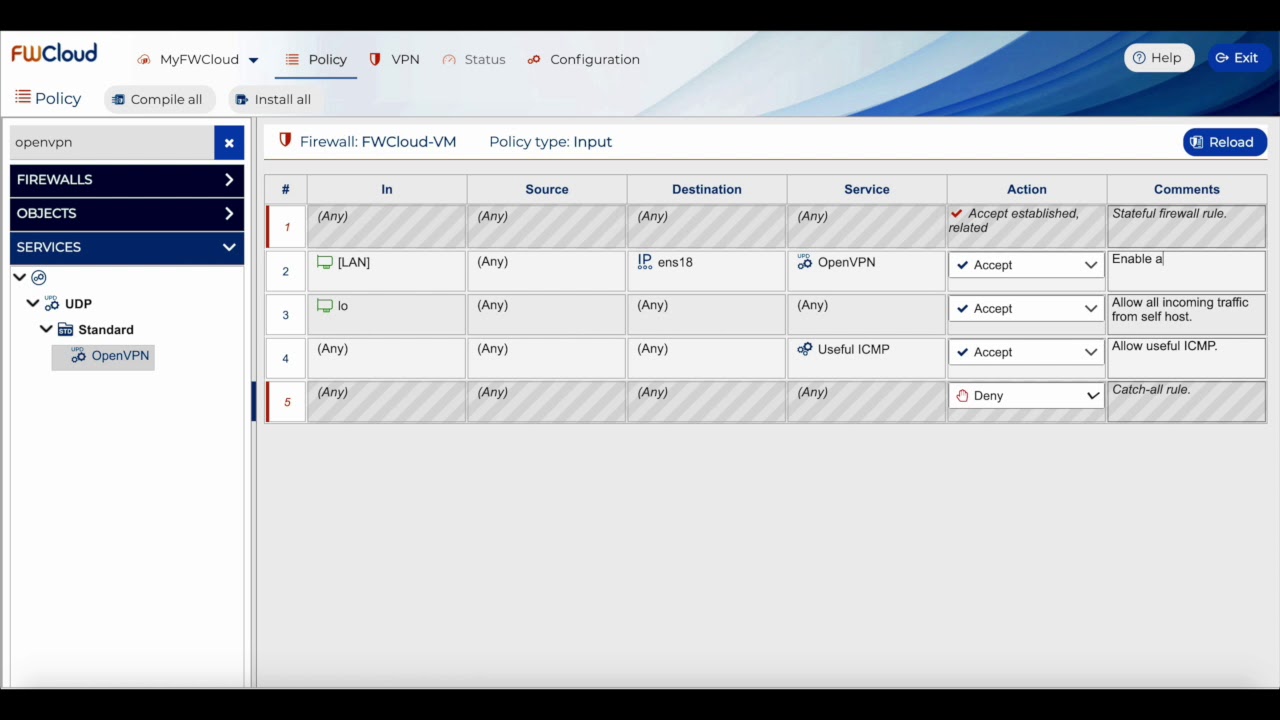
We are going to modify the policy of our firewall to enable access to the OpenVPN server that we have just created.
In this way we will allow the firewalls belonging to our FWCloud platform to be connected to it through the administration VPNs, with which we can manage them in a secure way.
To better understand how we will manage our firewalls and firewall clusters from a FWCloud platform, in the following video tutorial we will set up a new firewall and a new cluster of firewalls that we will connect to our FWCloud server through management VPNs.
We will also see how to create a folder within the firewall tree to better understand how to organize our firewalls / clusters.
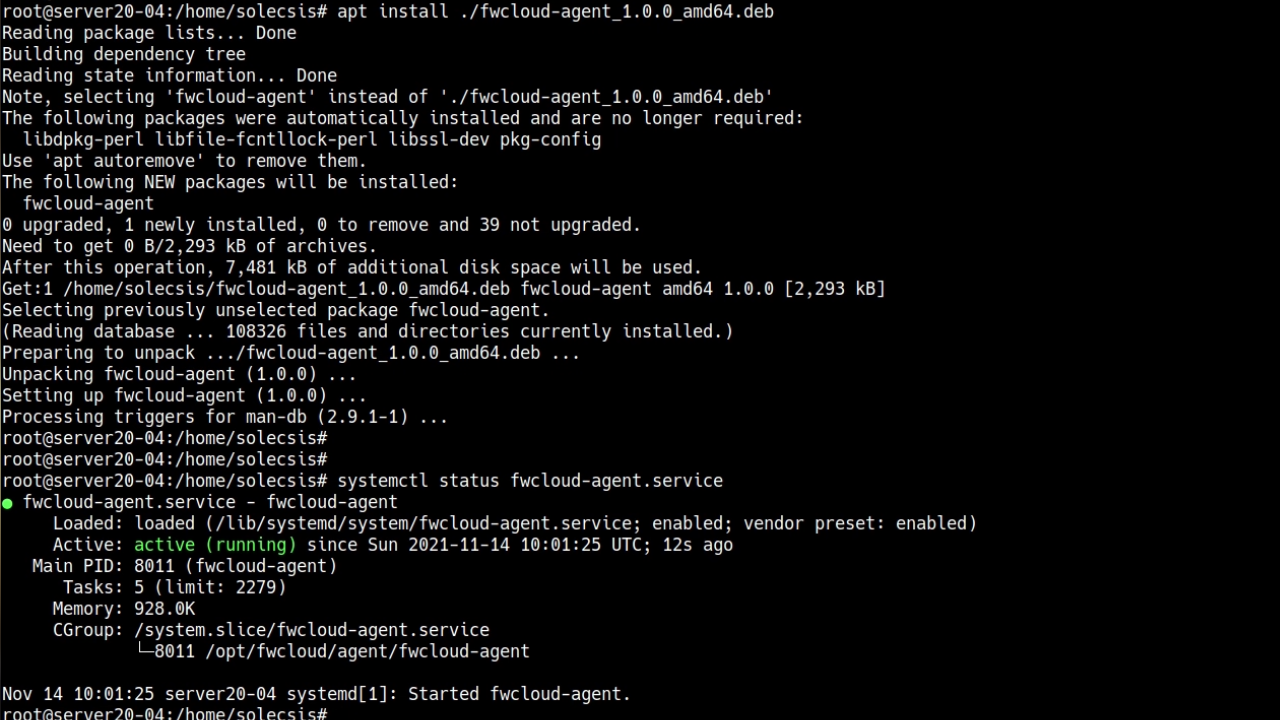
Now communication with the firewalls can be done through an agent.
This FWCloud Agent provides faster communications between FWCloud and managed firewalls, and among other things, it avoids the repetition of connection establishments.
Furthermore, the actions that can be performed remotely on the firewalls are now limited to those allowed by the agent's communication API, thus giving greater protection.
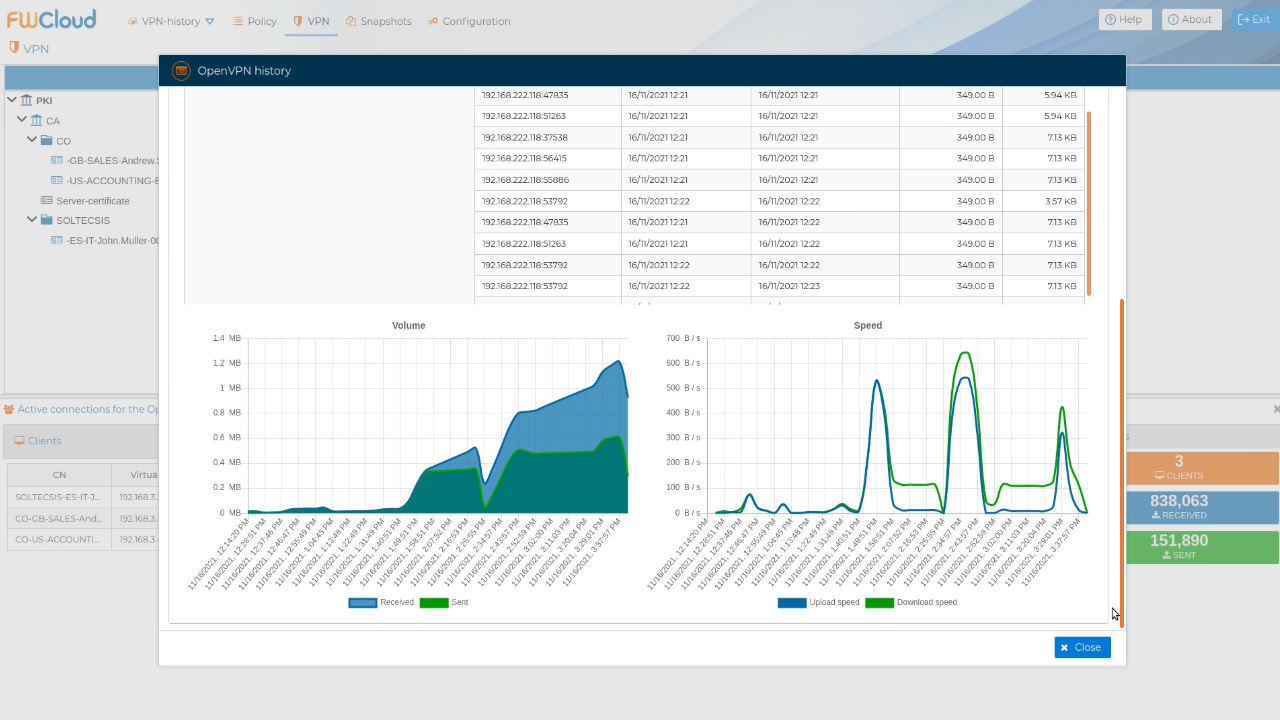
Thanks to FWCloud-Agent we can do many more things that are not feasible through SSH communication, such as maintaining a history of the status of VPN connections.
We can check the history of all VPN connections a FWCloud managed firewall has. This information is obtained by periodically connecting FWCloud to the agents installed on the managed firewalls. It is stored in the database and can be reviewed at any time.
Also we can see in real time the amount of traffic a VPN connection is using.
We have added support for routing to FWCloud-UI. It is now possible to fully create and manage an advanced routing policy from FWCloud-UI.
In this video, through two examples, we are going to show you step by step how to create and manage the routing tables, as well as the rule tables that allow the system to select in which table it should look for the correct route to a destination.
In this way, it is possible to use all the power that FWCloud-UI offers when composing, editing and displaying a routing policy.
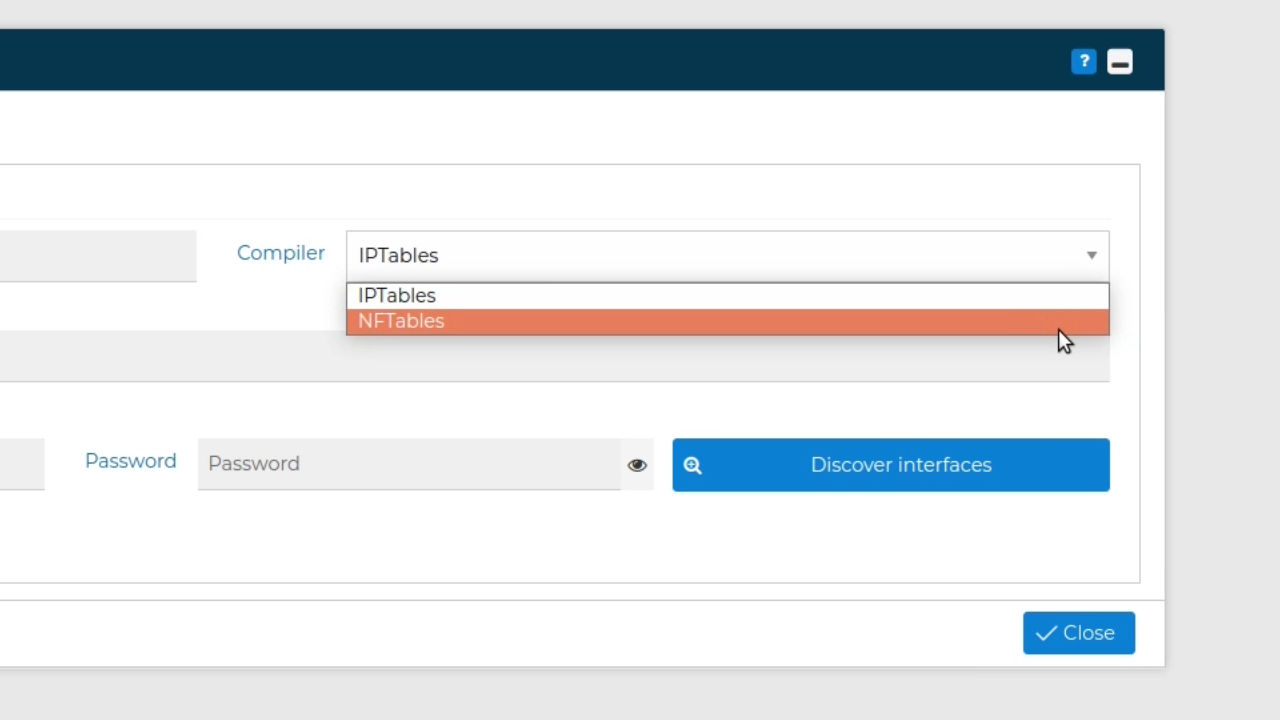
In this video we show how to use this new functionality. You can compile the security policy for the packet filtering framework of your choice, as simple as ever, just edit the firewall properties.
You can also preview at the rule level how it will look once compiled.

FWCloud-UI allows you to block VPN connections, allowing their subsequent unblocking. The interface clearly shows the connections that we have blocked. It provides simplicity whether they are habitual or sporadic actions, and at the same time speed in the changes of the connections in a graphical and intuitive way.
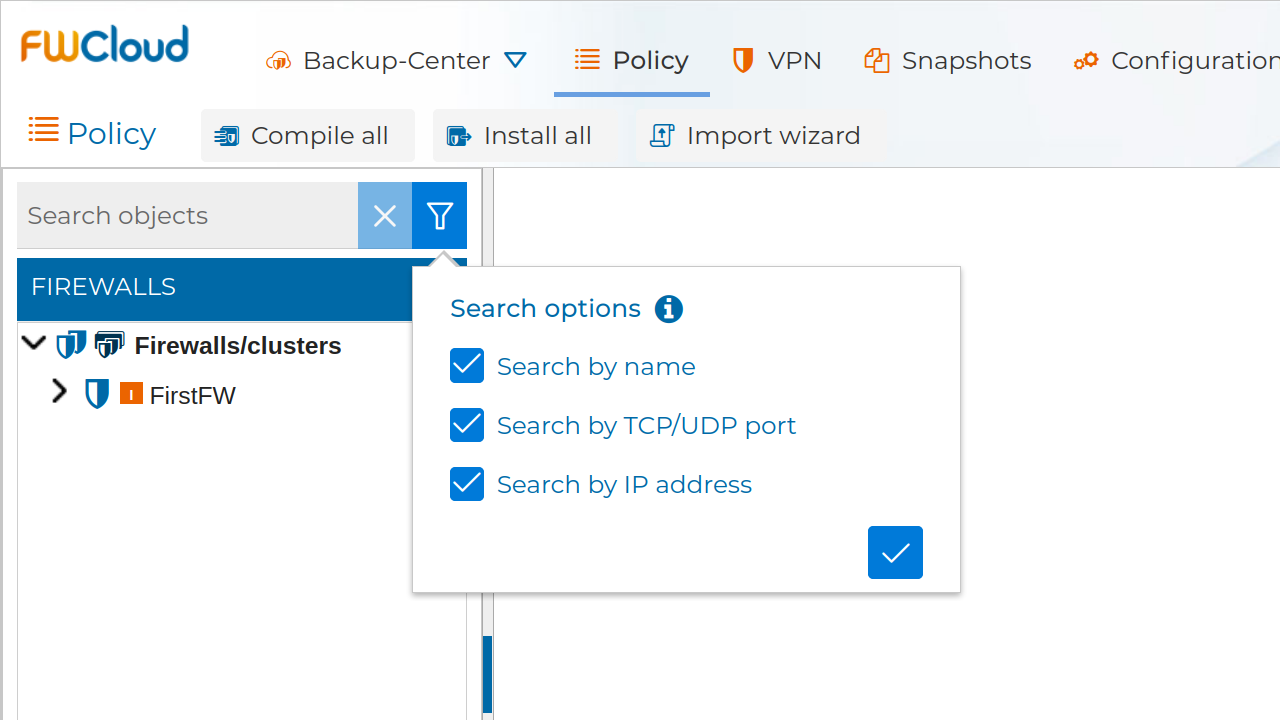
The search function has been improved.
Now it is allowed to search by names, as well as IP addresses and TCP / UDP ports.
The pattern to find can match both the name and the value assigned to the different objects in FWCloud-UI.
Let's look at a practical search case.
In this video we will see how we can use the FWCloud autodiscover to obtain the information of the network interfaces but this time working with a cluster of firewalls. FWCloud only needs to have network access to the cluster nodes and it will automatically retrieve all the information. This can be incorporated directly or modified in the user interface before including it.
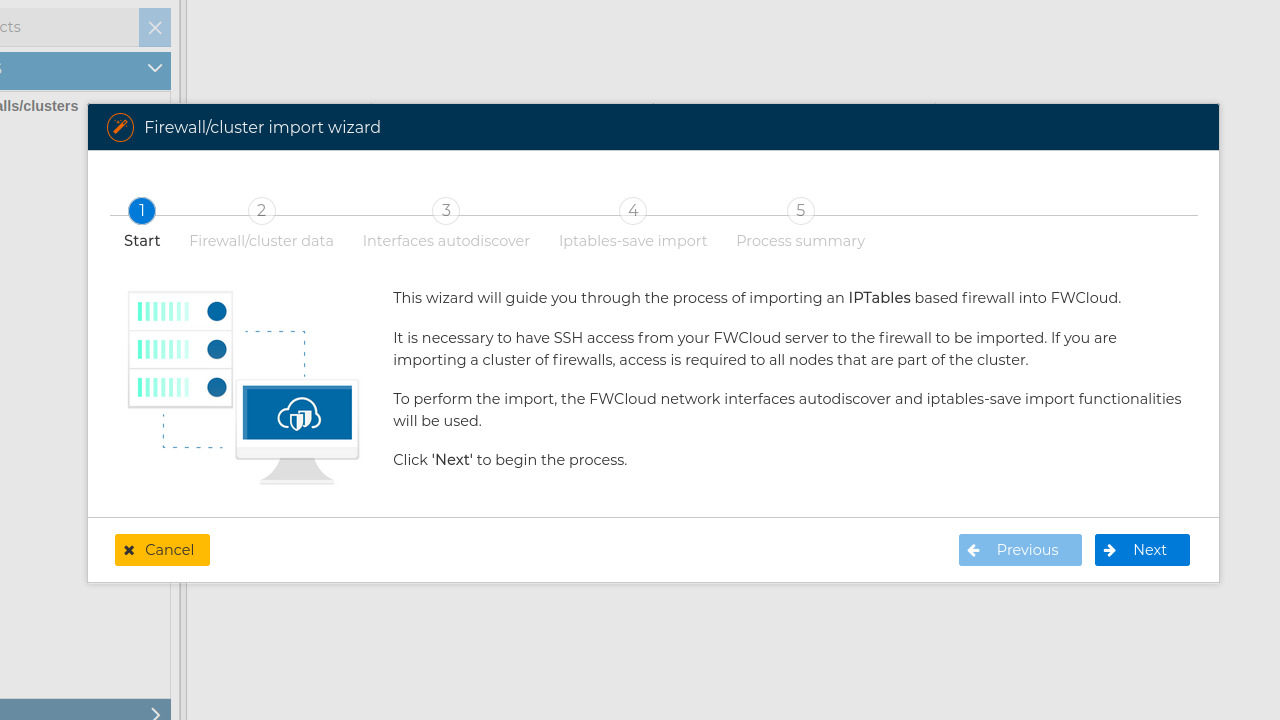
This wizard makes easy to import a firewall cluster into a new FWCloud managed cluster. Cluster nodes to import only need to be able to export their policy using the iptables-save command.
The wizard will guide us discovering the interfaces and IP addresses of all the nodes of the cluster, it will create these objects in the FWCloud-UI infrastructure and it will obtain the security policy of the cluster and leave it ready to be reviewed and applied in the new cluster.
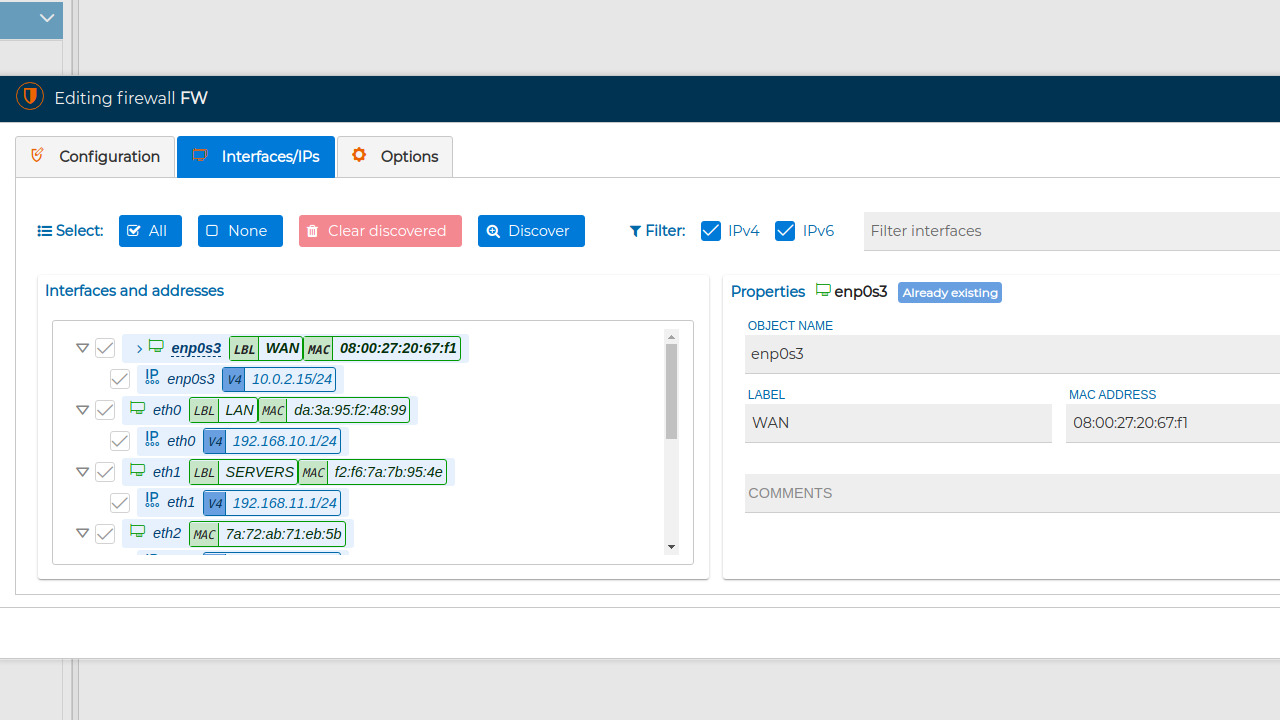
With the "Autodiscover" utility, FWCloud-UI is able to connect to a firewall and obtain its network interfaces as well as the IP addresses in version 4 and 6 and the associated MACs.
We can add this information to the configuration of our firewall in FWCloud-UI, in addition to making adjustments while we are running the utility.
It is very useful if we have to integrate information from many network interfaces.
This wizard guides us step by step in importing the policy of any firewall compatible with the IPTables-save format to FWCloud.
This tool allows us to migrate a firewall in a few clicks to be able to manage it with FWCloud.
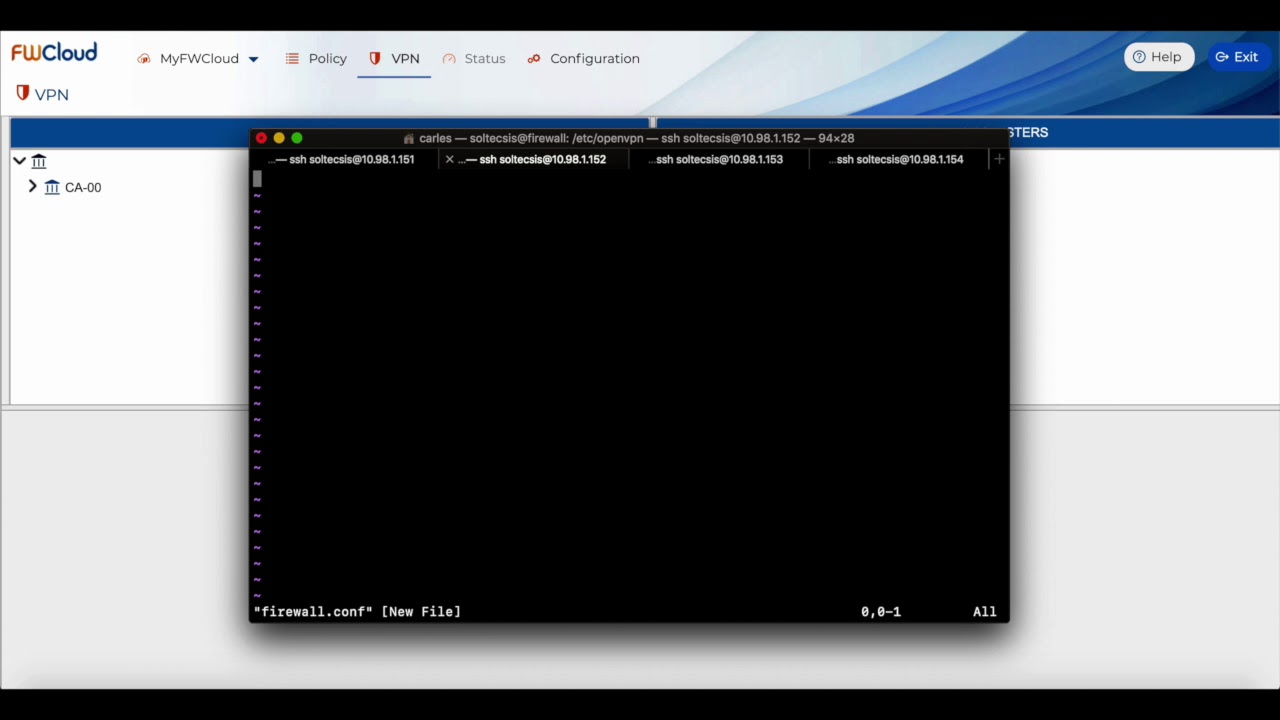
In this video, we set up the management VPNs for the firewall and cluster of firewalls that we have just created.
We install the respective VPNs that we have just generated, both in the VPN server (CCD files) and in the firewall and each of the nodes in the firewall cluster.
We generate the necessary security policy in the firewall and in the cluster to allow the management of the security policy from our FWCloud platform.
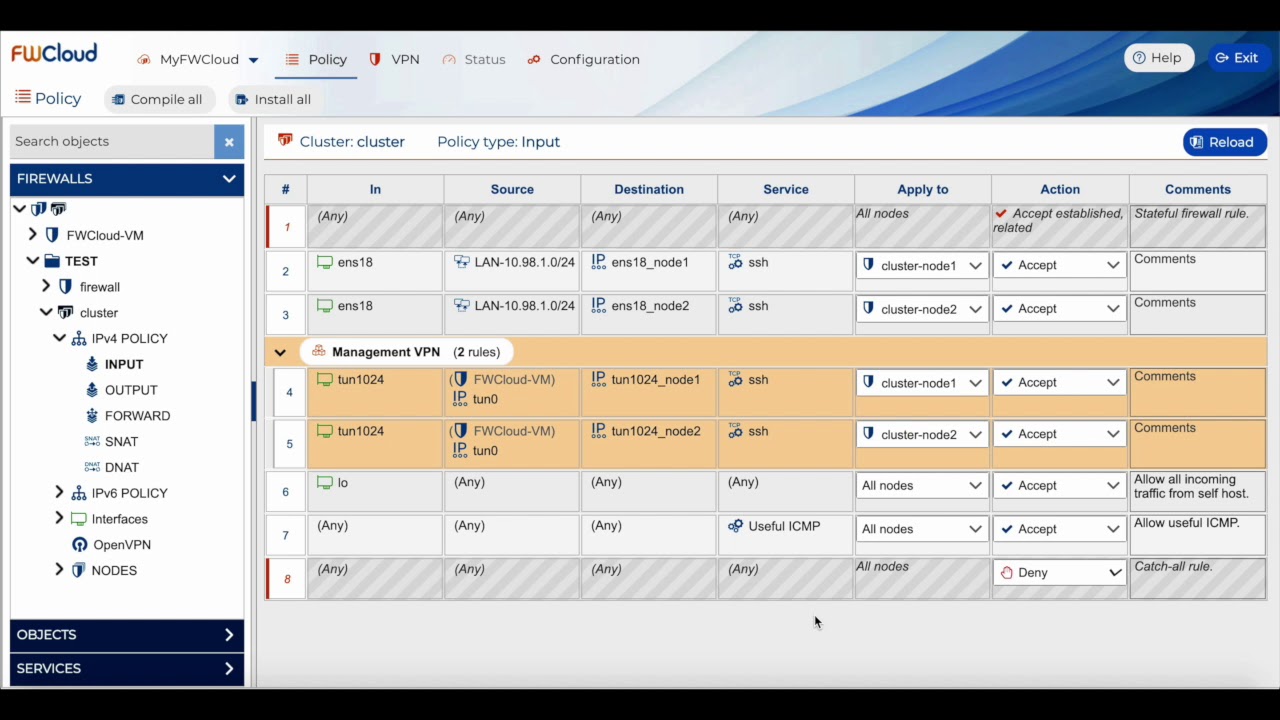
We modify the configuration of the firewall and cluster to be able to load the policy through these the VPNs of administration that we created in the previous section.
We compile the security policy and proceed to the installation of it using the administration VPNs that we configured in the previous section.
This is very useful, given that the firewall / cluster that we want to manage can be anywhere in the world, all it needs is an Internet access to be able to establish the administration VPN. In addition, it is very safe, since each VPN is unique and assigned a specific IP.
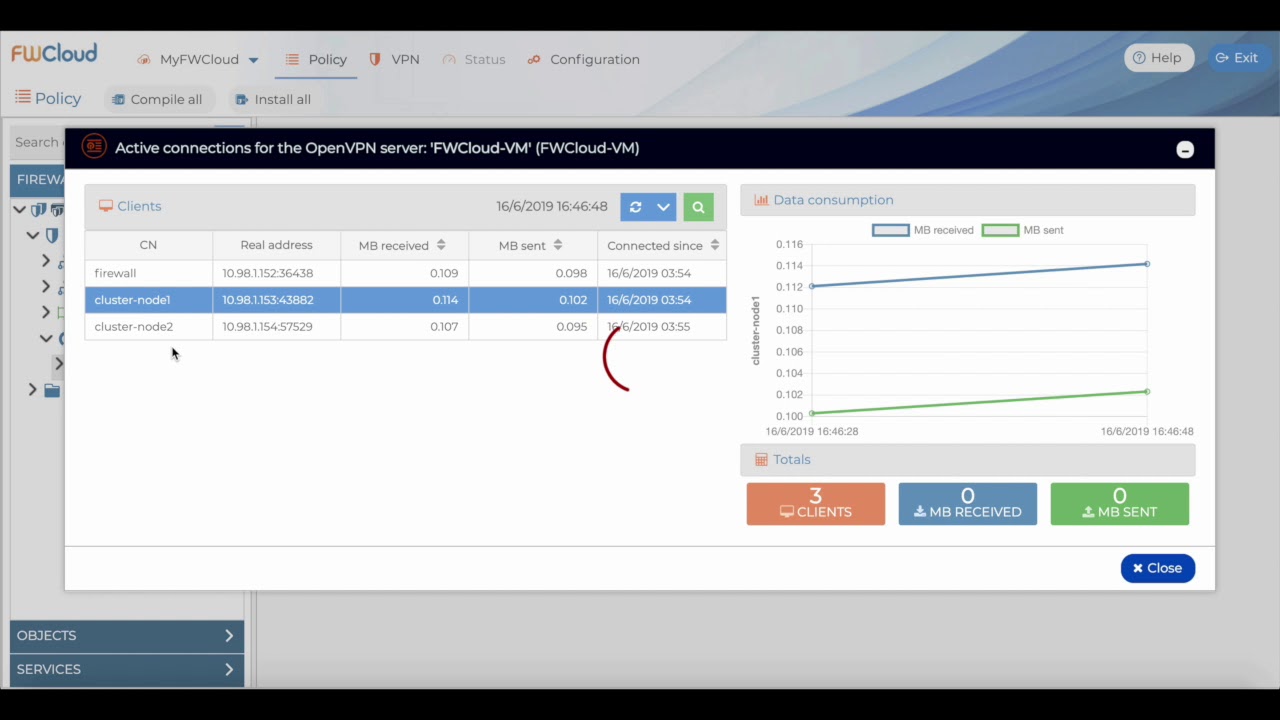
You can visualize the real-time status of the VPN connections established on our FWCloud server.
These VPNs correspond to the administration VPNs, but we could visualize the status of any other OpenVPN tunnel terminator through this menu option.